
Story of the Neito keyboard
Creating the Neito keyboard and running the GB was not quite as easy as planned. This is the story of how we created Neito and all the bumps we faced with the group buy.
Table of contents
Feel free to jump to the topic you are most interested in or read the full story.
Preliminary words A BIG thanks The beginning #ic-neito PCB artwork and revisions The chosen PCB artwork Extra B key In-switch LEDs The layered acrylic case The first prototype The first assembled Neito Debugging RGB LEDs Group Buy setup The group buy is live! It kind of went viral... The group buy kept growing The shutdown PCB issues Case issues - Case assemblies The build guide Packaging & shipments GB Shipments on the map Feedback from participants Sale of additional units Thoughts about running a GB Future keyboard GBs and Neito Round 2
Preliminary Words
I find it fascinating how Neito came to be. I've learned a whole lot from this project with PCB design, 3D modeling, and the organization of sales. It took about 6 months between the first proto and shipment of GB items and have had its up and downs. I felt that this keyboard was worthy of a full story as there is more than just the group buy page.
A BIG thanks
I want to give some shoutouts since this project would never be the same without all the support ❤️ Migiii This project might have never happened without you and all your help, thank you! 💯 Magicsmoke With you, there is more light in this world 💡 Thanks for the repairs!
Check out magicsmoke on GithubErgorius & Hekeke I also want to give a shoutout to you guys for helping the project in various ways ✌️
Ergorius keyboard storeHekeke's keyboardsThe Finnish Mechanical Keyboard Community (FMKC) Thanks for all the feedback and support, I really love this community as it's so very approachable and lovely. 💕
Check out the Finnish Mechanical Keyboard CommunityThe beginning
If you have been active on /r/mechanicalkeyboards you have probably seen the TGR Alice keyboard. Many people really enjoy how this layout looks and the premium-wibes TGR brings to the table. It's a great alternative when the classic 60% keyboard is not too ergonomic. There is an open-source fork of Alice called Arisu and it rocks a slightly different layout that is a hybrid between 60-65%. In my opinion, Arisu is a superior layout to Alice, but the main issue still stands as both of them are ANSI-only keyboards. If you are an ISO user, you are out of luck.
There has been one keyboard that is similar to Arisu but in ISO layout, and it's called Majbritt. I tried to get my hands on one from the /r/mechmarket but without any luck. I was also in contact with Sebu who created Majbritt but he wasn't interested in sharing the Gerber files. Seemed like there was none of the product that I'm looking for.
The only sane thing to do at this point is to try to figure out how I could create the layout myself.
Photo from this Reddit thread
#ic-neito
I made an interest check(IC) channel in the Finnish Mechanical Keyboard Community Discord server to see if there would be people interested in it. To my surprise, many reacted to the IC. We were supposed to do this together with a fellow Discord server member Ergorius but he had to focus more on his own keyboard project Louhi, which is btw pretty awesome.
Check out Louhi keyboardAs we were trying to fork the Arisu PCB, Migiii felt that we were doing things the wrong way and he decided to step in and help out with the project. With experience in other custom keyboard projects, Migiii created the initial base version of Neito.
At the time, we were also writing an article for the Finnish computer magazine Skrolli and featured the initial version of Neito there.
See the Skrolli magazine
PCB artwork and revisions
The PCB artwork was obviously really important. We had already decided on the name but the artwork was still open. We iterated with Japanese style, vaporwave, memes, haikus, and Kalevala but none of these really seemed to fit the board that well.
Here are some of the iterations we went through, you can enlarge images by pressing on them.


The chosen PCB artwork
One evening when screen sharing design iterations on Discord, I was iterating the usage of Finland into the board. With input from viewers and rapid Gimp skills, I eventually created the massive letters with Finland as the cutout. It looked awesome and became to be with some minor tweaks to the PCB artwork of Neito.

Extra B key
The PCB prototypes were ready to be ordered, but we started to question the design of the keymap at this point. Do we want to create a Majbritt-copy with additional functionality, or would we want to have our layout? We noticed that we could add in an additional B-key, hence mimic more Alice layout and make our design unique at the same time.
One would think that adding in one button would be trivial and you are right, but due to the way we had placed the Atmega chip on the PCB we had to reroute everything surrounding the Atmega. This was no big deal but just work that had to be done if we wanted the extra B key.
In-switch LEDs
We were about to order prototypes but received some feedback over the missing in-switch LEDs. We weren't too keen on the idea but thought that why not adding it as it shouldn't be too difficult.
The first iteration was done with an N-channel Mosfet, but when we noticed that we could simplify the routing of power to the LEDs, we changed this for a P-channel Mosfet instead. This meant that we had to have the power run the other way around from what initially planned.
The support for LEDs was clearly a "nice to have" feature but we didn't plan on ordering prototypes with the LED components as that would have made the prototypes more expensive.
The layered acrylic case
Before I had even had time to think about the case, Migiii had already created an initial version of it to be laser cut. With some modifications like the additional space and keyboard stand parts of the excess plastic, we had a ready case to order.
I've had a few DZ60 PCBs where the Type-C port has become loose after connecting a cable too many times. A small support piece for the Type-C port could help with this issue. We figured out that we could laser cut from the same acrylic piece that slots perfectly in between the case parts and gives support for the Type-C port. After lots of measurements and some iterations, we had a good candidate for the Type-C support piece.
The first prototype
We ordered a total of 5 prototype PCBs with assembly only of the most critical components. It was nice to see that the keyboard worked on the first try. We ordered the prototypes around new years eve 2020-2021 and received them around the beginning of February.

The first assembled Neito
I built the first Neito in one of my streams. It took a whopping 4-5 hours as there was a clearance issue and the switch holes were a tad too tight. At the end of the day, the keyboard was properly working and felt awesome. The first Neito was built with Durock V1 stabilizers, Kiwi switches and double shot ABS keycaps.
More photos on the GB pageDebugging RGB LEDs
As the clear case looks amazing, we started thinking if we should after all try to implement RGB underglow. We didn't have spots for the LEDs in the PCB so we had to test it out with some nasty looking hand wire solution and an RGB LED strip.
We had to get a jump wire attached to one leg of the Atmega chip, add a resistor in between and then solder that and power + ground to the LED strip. After reworking the code for some time, we finally got the LEDs to shine.
This meant that we had more work to do with the PCB design as the RGB LEDs and everything related to the wiring had to be added to the PCB design. We didn't have a true prototype of this but due to its simple schematic we didn't feel that it was too worthy of ordering new prototypes just because of this.

Group Buy setup
I had never hosted a group buy(GB) before but knew the overall concept of how it would be arranged. The first issue however was that I didn't have any payment platform for taking payments. I played around with a few ideas on how to tackle this issue.
- Snipcart, plug and play webshop for static sites
- Shopify
- WooCommerce
As someone who works with WordPress as the main income, WooCommerce would have been the clear decision to build the GB store on, but since my own site is a static site built with Hugo, I didn’t want to hassle with some web hotel just to set up this store. I was looking at Shopify as an alternative but still wanted to sell the items via my own site. For static sites, the clear solution was Snipcart.
I set up Snipcart, set up potential shipping locations and had one eager buyer be my test-buyer for the store. I wanted to create this GB with the main intention to serve the Finnish Mechanical Keyboard Community and hence wanted to run the GB as transparent as possible.
The group buy is live!
The group buy went live on the 12th of February and I received almost instantly a few orders from active members of the FMKC. I created the Reddit post and started to gain some attention from abroad. Unfortunately, I wasn’t able to get the GB up on Geekhack due to their requirements of having to prove that you are not a spammer by contributing to the discussions. Geekhack admin eventually got in touch with me but it was too late at that point and I had no interest in starting to spam their forum to get my GB up there.
Group buy page
It kind of went viral...
The Finnish tech-forum io-tech made an article over the group buy. This was something I never expected would happen and I got really excited because of it. The flipside of the coin with this article was that it brought the GB and keyboard scene up for more casual users who didn’t understand why something like this was even being sold.
IO-tech thread
The article got quickly spammed with toxic comments and despite the CEO of io-tech trying to explain the niche. Some commenters didn’t seem to understand the concept at all.
There were also people who thought that this project looked really cool, and some FMKC members also participated in the discussion to clear out the misconceptions that some commenters had.
I didn't get hurt by any of these comments but rather took them as hilariously stupid, this one in the image being my favourite one.

io-tech discussed this keyboard in their weekly video on YouTube.
MechMerlin also checked out the keyboard in his stream and seemed to approve it. The only downside that he mentioned was the lack of change being hot-swap sockets.
The group buy kept growing
When the MOQ goal of 20 orders was achieved I started to be slightly stressed over how many orders there would be. There was still a lot of time left in the GB and yet I received every now and then a new notification over paid orders. I had never organized a GB before and we were doing the GB as kind of a prototype run, we hadn’t ordered the PCBs with the same configuration and the addition of RGB underglow was still in question will it work or not.
The shutdown
I had been thinking about closing the GB for a while, and every new order made me somewhat more unsure about it. I started wondering about what if something goes wrong, what if the RGB LEDs don’t work after all. What if components are missing?
The GB was at almost 50 orders when I decided to pull the trigger and shut the group buy down. I could have kept it up for longer but due to potential damage control and limiting my own workload, it was better for the GB participants that I shut it down. I didn’t want to do it but it was the sane thing to do.
PCB issues
When I received the photos of assembled PCBs from PCBWay I noticed that the boards were missing a single SMD-resistor which made the underglow not work. This caused some additional time in production as I wanted to have the boards fully assembled in the factory.
When I received the PCBs we noticed another bigger issue. All the RGB LEDs were facing the wrong way hence making the underglow not work. Thankfully the RGB LEDs had voltage protection since otherwise each PCB would have bigger issues if connected to a power source before flipping the LEDs. The boards were otherwise fine and worked well.
I thankfully have a friend who has the right tools to rotate the RGB LEDs on each PCB 180 degrees, though this was not a small job in itself. Every board required about 20 minutes of work to flip the 11 RGB LEDs. My friend handled all the PCBs and was of course compensated for the work. Shoutout to magicsmoke for doing the repairs
The LEDs were the biggest issue but there were also a few PCBs that had “loose” SMD components and one broken PCB. The loose SMD components were luckily easily fixable by applying a little bit of solder on the SMD components pads.
Case issues
I had underestimated the QA work that I had planned on doing. In every case, every plastic piece had to be checked for potential scratches caused by the production. The last thing someone wants is to be a part of a GB and receive a scratched acrylic case. I checked every case by hand for potential issues.
About 10% of the cases had some sort of scratches but I was happy to know that I would be receiving replacement units for the scratched ones. When I noticed the issue, I was still waiting for the PCBs so there wasn’t a rush in that sense with the replacement cases.
Case assemblies
I assembled some cases to show what they would look like for future reference. When assembling them I noticed an interesting issue with a few cases which based on the issue that acrylic thickness might vary. The Type-C support piece required an exact 3mm cutout, but if the acrylic was too thick at the type-c support piece, you couldn’t slot it in since it didn’t fit. This happened in two units I assembled. Luckily this was easily fixed by sanding the Type-C piece with really fine grit sandpaper eg. 1000. The finer the sandpaper, the cleaner the end result.
One weird thing was that depending on the case, some cases didn’t fit well the screws that I had reserved for the GB. These screws were slightly too short to support all 4 legs of the case, but at the same time too long to support only 3 legs. This varied a lot case by case (no pun intended) as some cases had no issues while others had something more significant. Ordering new screws for the cases would have taken so long that I decided that we’ll need to work with what we have. If you had issues with the screws, you could either replace them with some other M2.5 screws or shorten the included screws to fit better. I've tested shortening screws both with a Dremel and side cutters. The Dremel leaves a nicer finish but the side cutters are much safer and faster to use.
First assemblies
Together with the GB, I had offered my own build-services for the Neito keyboards. In the end, I had 4 Neitos to assemble. How this worked out was that if you wanted your Neito to be assembled by me, you needed to order the switches and stabilizers that you wanted for your build, I would do the assembly during a Twitch stream and then finally ship the assembled keyboard to you after it had passed my own QA.
This was nice in the sense that I didn’t have to assemble another Neito for myself and got to test that everything indeed worked together as planned. During the assembly, I noticed that despite the larger switch cutouts in the plate, the cutouts were still slightly too tight for the keyboard to be assembled without small felt pieces keeping the plate away from the PCB. I decided to ship every keyboard with some felt pieces so that the assembly would be easier.
The first builds were also good for taking photos for the keyboard assembly guide.

The build guide
Because assembling a layered acrylic case can be somewhat tricky and I wanted to have the build guide live before doing any shipments. I took photos while I was assembling the commissions and used those to create the build guide for the Neito keyboard. The guide is helpful and is updated whenever a new issue occurs and guidance is necessary. Please read it if you plan on assembling a Neito keyboard.
As of writing, the PR has been pending to QMK repo for about 5 months and it's still not merged. Hopefully, it is merged soon so that we can get Neito to be a part of the supported layouts in VIA.
The build guide
Packaging & shipments
I first packaged every order to their respective box and kept track of them all with the order numbers. Once I was ready to start shipping the items, I noticed an issue with shipments abroad. If I wanted to ship anything outside of Finland, I needed in addition to all the information that I already had, the phone number of the GB participant. The shop I had set up didn’t have phone numbers as a field in the default setup so I had to ask for these by mail. Almost all participants abroad answered my email within a few days which was nice as this made it possible for me to ship the items earlier.

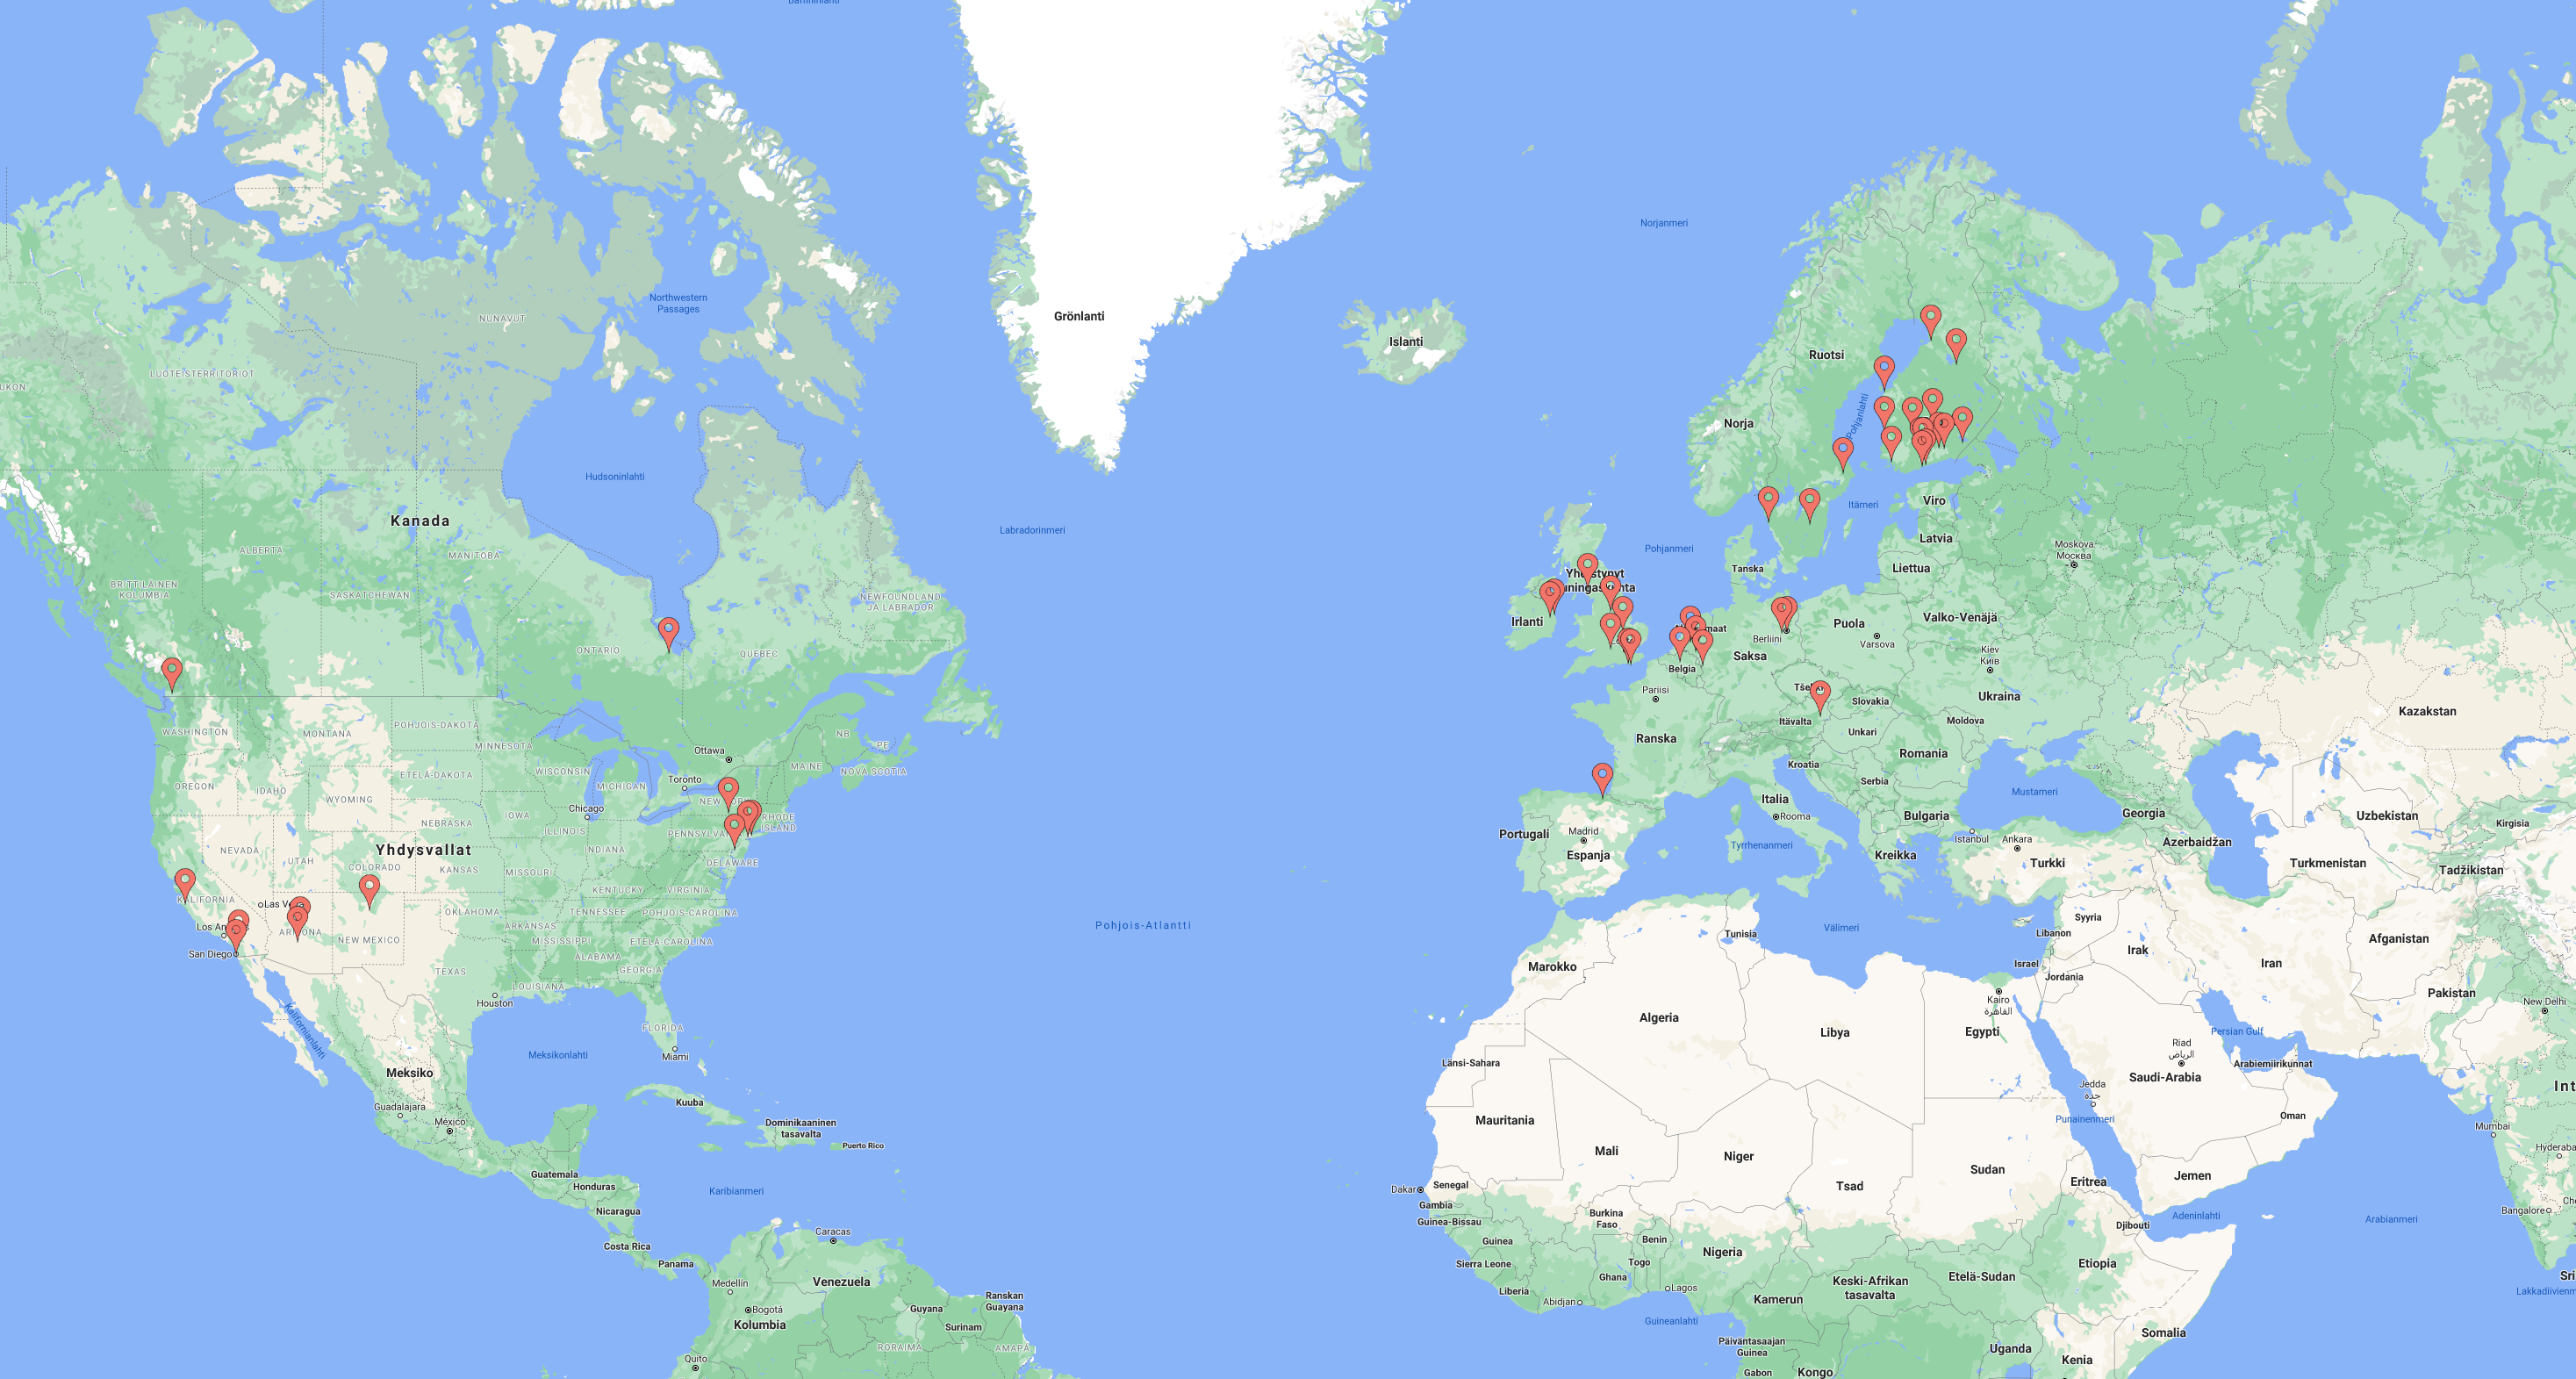
GB Shipments on the map
I created this visual representation of where all the packages have been sent to. Sadly no Asian orders were made in the short timespan the GB was open.
See full image
Feedback from participants
Despite the shipments were postponed and there were some issues in the production, no single participant has complained about anything! I even got some really positive feedback from a few participants.
“This has been the best GB I've been part of in a long time, you've done an excellent job. I've been in 15+ buys now and the number one thing is communication, which you've been great at. Delays and problems happen in all buys, they're expected 😄 So it's just a matter of keeping everyone in the loop”
- GB participant
“thanks so much! It arrived yesterday and I'm happy beyond words. I still get 145 wpm with it.”
- GB participant


Sale of additional units
After most of the GB packages had been sent, I started to see how I would sell the additional units. I had some extras in case of issues arising or packages being lost, however, when more and more packages arrived at their destinations, I opened up the sale of extras.
As of 22.7.2021, all the additional units have been raffled out and the focus has been steered towards R2. There might be some handwire Neitos up for grabs but I would suggest you to keep an eye on #post-gb-neito channel in FMKC Discord for any updates.
Thoughts about running a GB
I knew that there would be work but the amount of work in this GB came as a surprise. I think the most time-consuming things in this GB was the QA and shipments, and of those, the QA could be done by the factories. You would think that it’s simple to handle a GB but if you want to do everything yourself, it does take a significant amount of time. As a perfectionist I did spend too much time on this GB and also the set price is way too low compared to my expenses and time invested.
This GB has shown me how it feels to arrange a GB and I've learned how things could be done with less effort. I would arrange some sort of testing of PCBs in the factory that produces them. This way I can be sure that all work straight out of the box. Acrylic cases QA can be a bit harder since it’s 100% manual work but I bet a manufacturer would be willing to do this for an additional fee. If there is any work one can outsource, I would do it.
I could have saved a fair amount in the shipment prices, probably around 20-40% but this would have required additional work to investigate how I could send out all the packages as a batch. Due to the phone number issue, I wasn’t able to send out all packages at once, and it was just easier to do it the traditional way. I did borrow a printer to print out the packaging labels as writing those by hand would have been a nightmare. If the GB would have been of a smaller scale, I might have done it by hand.
Future keyboard GBs and Neito Round 2
I've been thinking of hosting a Neito Round 2 but I don't think it will happen right away as there are some things I want to improve with the design of Neito. There is no ETA but I can say that I'm planning on it but it'll take some time before everything is ready for it. Please be patient and remember, PM'ing me about Round 2 won't make it come any faster 😅


